Help & Advice menu
An Introduction To Flooring Types
There are so many floors out there, and we understand that choosing the right one can seem overwhelming. That’s why, to help guide you through the process, we’ve created the easiest, clearest introduction to flooring on the internet!
The Room Compatibility Chart
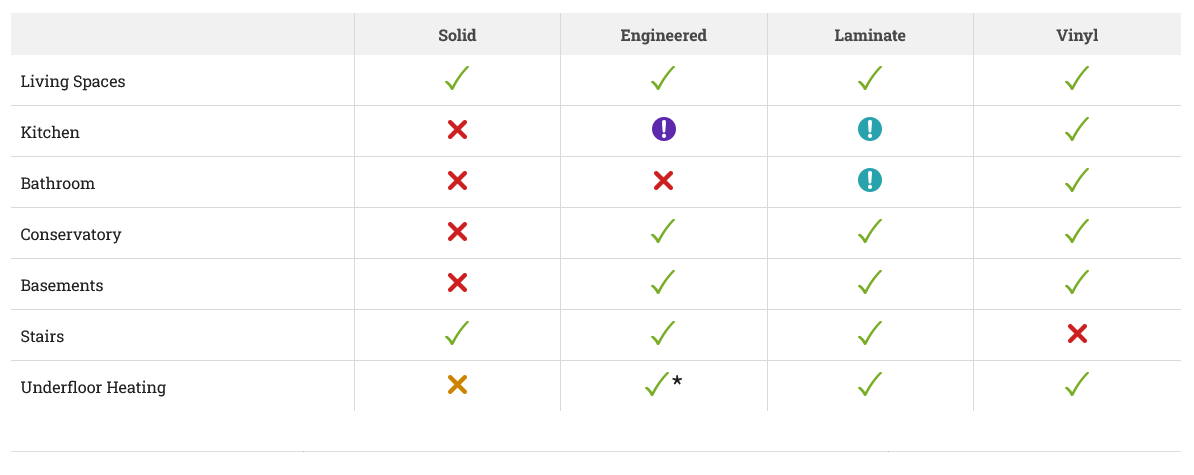
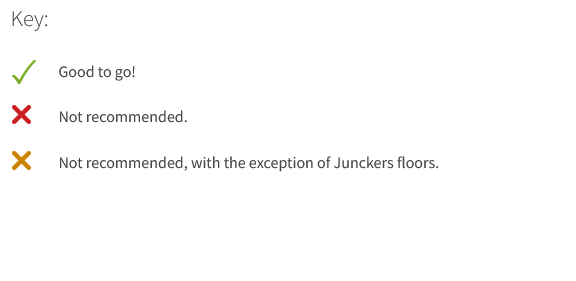
First, let’s start with the room you’re covering. In practice, most floors can go in most rooms, but some need to be looked after more than others. To explain this, we’ve created the grid below. Simply pick your room(s) and see which floors are best for you!
|
|
Our Range Of Floors
Not sure which type of flooring is right for you? Read our guides to find out the key differences between each type of flooring.
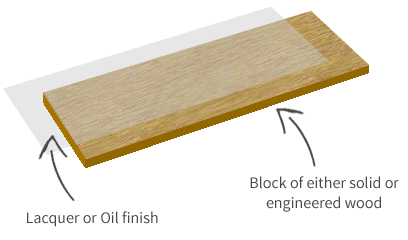
Solid Wood Floors

|
Solid wood flooring is cut from a single, beautiful piece of timber. This makes for a pure, simple and authentic wooden floor. Because of their sensitivity to moisture and heat, they aren't suitable for every room but, given their ability to be sanded many times, they can last for generations.
|
Engineered Wood Floors
|
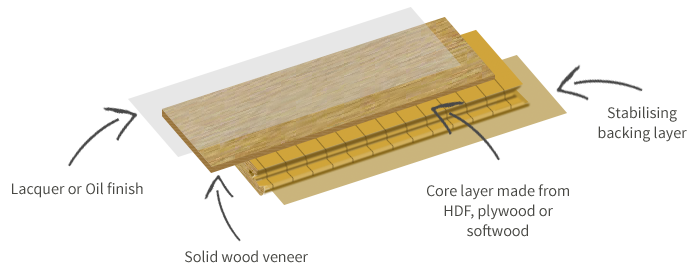
Engineered wood flooring is made of layers. The top layer is a veneer of solid wood which gives you that authentic look and feel. The other layers are designed to resist changes in moisture and heat, which means you can lay these floors in nearly any room.
|
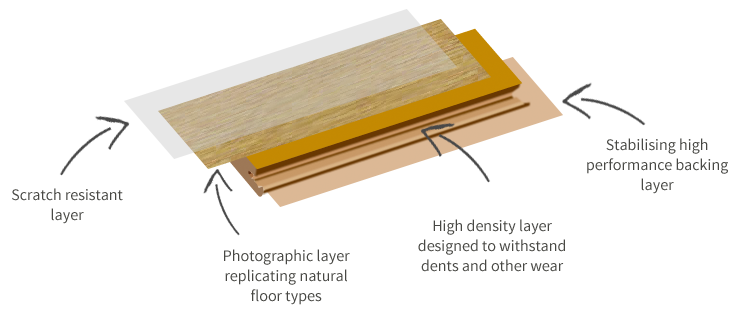
Laminate flooring
|
Laminate flooring looks just like real wood or stone, but the image you see is actually a photo. This means that they can come in a wide range of visually stunning designs which can be shaped as planks or tiles. These floors are highly resistant to splashes and scratches which makes them fantastically versatile.
|
Parquet flooring
|
Parquet flooring is made from small blocks of solid or engineered wood which can be arranged in beautiful patterns. Parquet is the choice for country homes, grand entrances and any room where you want to make a statement. It’s the choice of the design-conscious.
|
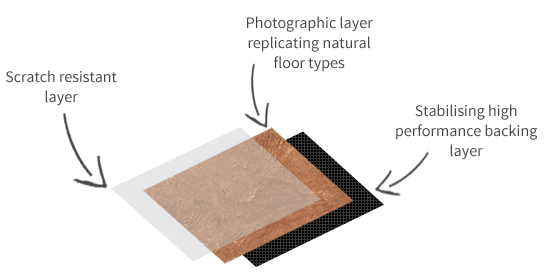
Luxury Vinyl Tiles
|
Our vinyl flooring comes in the form of thick, luxury tiles. They are super tough and totally waterproof, meaning they can be laid in any room in the house. Like laminate, the top layer is a photo, giving you a huge choice over the look and style of your floor.
|
Troubleshooting
We occasionally get calls from customers who are worried that there’s something wrong with their flooring. More often than not, though, it turns out to be just a natural feature of the wood, and something which can add charm to the floor.
Here we’ll go through some common concerns and explain whether it really is a problem.
Here we’ll go through some common concerns and explain whether it really is a problem.
By its very nature, each piece of timber used for solid wood and engineered floors is unique, with variations in grain and colour. It’s one of the main charms of solid and engineered floors – the unpredictability of nature ensures that your floor is a one-of-a-kind.
If you’re after a more uniform appearance we recommend a stained floor, as the stains help mask the different shades. Prime grade floors also carry fewer features and less colour variation, so are great for a more regular look.
If you’re after a more uniform appearance we recommend a stained floor, as the stains help mask the different shades. Prime grade floors also carry fewer features and less colour variation, so are great for a more regular look.
If you’re seeing pale strips across your oak flooring, they’re actually
called Medullary Rays. These rays are natural structures which carry
fluid from the outer parts to the core of the trunk. In all oak
products, the Medullary Rays are an important part of the wood’s natural
appearance and one of the charms of oak products.
Scratches and dents are normal and inevitable for all real wood floors. Unless you’re after a nice “distressed” look, it’ll be important for you to reduce scratches and dents on your floor as time goes on. For a quick and easy guide check out our wooden floor maintenance page.
Even with all possible precautions, scratches and dents will build up over time. If you'd prefer to have a cleaner, newer looking floor you may want to consider recoating or even refinishing your floor. Read our guides on how to refinish your wooden floor.
Even with all possible precautions, scratches and dents will build up over time. If you'd prefer to have a cleaner, newer looking floor you may want to consider recoating or even refinishing your floor. Read our guides on how to refinish your wooden floor.
Floors can squeak if the boards are rubbing against each other, which can be caused by uneven subfloors or changing temperatures. For a flat and stable floor, your subfloor must be level, which means less than 3mm deviation over a 1m area. Changing temperatures, meanwhile, will adjust the moisture levels, which is what causes wooden floors to shrink or expand.
The best way to avoid squeaks is with a high-quality installation. All our installation guides can be found here. Always remember to acclimatise your floor before you install it, which is explained here. And finally, you must be sure to leave a 10mm expansion gap around the edges of the room.
Another cause of squeaking is a sudden increase in moisture. This can actually be caused by painting and plastering in the room, which is why we always recommend that installing your floor should be the last stage of any refurb project.
If it’s too late to prevent the squeaks, talcum powder makes for a quick fix as it reduces the friction between the boards. A more permanent solution involves removing the area of flooring. Then it’s either a case of cutting back the floor very slightly (to stop it pushing on nearby boards) and/or preparing the subfloor to the recommended guidelines before refitting. We’d highly recommend finding a professional for this.
Causes
Lifting, warping and gaps are all different symptoms of the same mistakes, so it’s good to be able to recognise them and prevent them. Lifting is where the board comes away from the subfloor. Warping is a term that refers to a plank “cupping” (where the edges of the board are high and the centre is low) or “crowning” (where the edges of the board are low and the centre is high). Gaps are the small spaces that can appear between boards after installation.
Firstly, it’s important to acclimatise your boards, as this massively reduces the chances of any of these effects.
Secondly, always try to maintain a steady level of humidity. Moisture from below can cause cupping, moisture from above can cause bowing, and varying levels can cause gaps.
Thirdly, never neglect the expansion gap! This small gap (usually 10mm) around the edge of the room is vital for allowing the natural shift of the board to happen without causing any adverse effects.
Treatment
If you notice any of these symptoms in your floor it is most likely a problem to do with moisture. Don’t panic though, there are various steps you can take to return your floor back to normal. Eliminating the moisture source should be your first choice. If it’s from above, then a vent, open window or dehumidifier may all be appropriate. If it’s from below, things may get a little complicated, and we recommend calling in a professional.
Once the source of moisture is dealt with, your floor should slowly return to its natural state (a dehumidifier might help speed this up). If it’s still a problem, however, there may be a need to lift part or all of your floor. Once the boards are up, there are various things you can do:
Lifting, warping and gaps are all different symptoms of the same mistakes, so it’s good to be able to recognise them and prevent them. Lifting is where the board comes away from the subfloor. Warping is a term that refers to a plank “cupping” (where the edges of the board are high and the centre is low) or “crowning” (where the edges of the board are low and the centre is high). Gaps are the small spaces that can appear between boards after installation.
Firstly, it’s important to acclimatise your boards, as this massively reduces the chances of any of these effects. The details of this can be found here.
Secondly, always try to maintain a steady level of humidity. Moisture from below can cause cupping, moisture from above can cause bowing, and varying levels can cause gaps.
Thirdly, never neglect the expansion gap! This small gap (usually 10mm) around the edge of the room is vital for allowing the natural shift of the board to happen without causing any adverse effects.
Treatment
If you notice any of these symptoms in your floor it is most likely a problem to do with moisture. Don’t panic though, there are various steps you can take to return your floor back to normal. Eliminating the moisture source should be your first choice. If it’s from above, then a vent, open window or dehumidifier may all be appropriate. If it’s from below, things may get a little complicated, and we recommend calling in a professional.
Once the source of moisture is dealt with, your floor should slowly return to its natural state (a dehumidifier might help speed this up). If it’s still a problem, however, there may be a need to lift part or all of your floor. Once the boards are up, there are various things you can do:
Lifting, warping and gaps are all different symptoms of the same mistakes, so it’s good to be able to recognise them and prevent them. Lifting is where the board comes away from the subfloor. Warping is a term that refers to a plank “cupping” (where the edges of the board are high and the centre is low) or “crowning” (where the edges of the board are low and the centre is high). Gaps are the small spaces that can appear between boards after installation.
Firstly, it’s important to acclimatise your boards, as this massively reduces the chances of any of these effects.
Secondly, always try to maintain a steady level of humidity. Moisture from below can cause cupping, moisture from above can cause bowing, and varying levels can cause gaps.
Thirdly, never neglect the expansion gap! This small gap (usually 10mm) around the edge of the room is vital for allowing the natural shift of the board to happen without causing any adverse effects.
Treatment
If you notice any of these symptoms in your floor it is most likely a problem to do with moisture. Don’t panic though, there are various steps you can take to return your floor back to normal. Eliminating the moisture source should be your first choice. If it’s from above, then a vent, open window or dehumidifier may all be appropriate. If it’s from below, things may get a little complicated, and we recommend calling in a professional.
Once the source of moisture is dealt with, your floor should slowly return to its natural state (a dehumidifier might help speed this up). If it’s still a problem, however, there may be a need to lift part or all of your floor. Once the boards are up, there are various things you can do:
- Reduce board size very slightly to prevent them pushing on each other.
- Replace the boards altogether with fresh, straight boards
- If possible, and necessary, refit the entire floor with an expansion gap.
Lifting, warping and gaps are all different symptoms of the same mistakes, so it’s good to be able to recognise them and prevent them. Lifting is where the board comes away from the subfloor. Warping is a term that refers to a plank “cupping” (where the edges of the board are high and the centre is low) or “crowning” (where the edges of the board are low and the centre is high). Gaps are the small spaces that can appear between boards after installation.
Firstly, it’s important to acclimatise your boards, as this massively reduces the chances of any of these effects. The details of this can be found here.
Secondly, always try to maintain a steady level of humidity. Moisture from below can cause cupping, moisture from above can cause bowing, and varying levels can cause gaps.
Thirdly, never neglect the expansion gap! This small gap (usually 10mm) around the edge of the room is vital for allowing the natural shift of the board to happen without causing any adverse effects.
Treatment
If you notice any of these symptoms in your floor it is most likely a problem to do with moisture. Don’t panic though, there are various steps you can take to return your floor back to normal. Eliminating the moisture source should be your first choice. If it’s from above, then a vent, open window or dehumidifier may all be appropriate. If it’s from below, things may get a little complicated, and we recommend calling in a professional.
Once the source of moisture is dealt with, your floor should slowly return to its natural state (a dehumidifier might help speed this up). If it’s still a problem, however, there may be a need to lift part or all of your floor. Once the boards are up, there are various things you can do:
- Reduce board size very slightly to prevent them pushing on each other.
- Replace the boards altogether with fresh, straight boards
- If possible, and necessary, refit the entire floor with an expansion gap.